Showing posts with label Freebie. Show all posts

Thursday, February 6, 2014

Valentine's Day Photo Card Sign - Freebie


The kids and I took some pictures for the Valentine's Day cards we will be sending to family and close friends yesterday.  I made a simple photo prop for them to hold with our message on it.


Then I printed out my photos and attached them to folded cardstock for the front of my cards.  For the inside I made text box and added "SWAK! And a hug, too!" for the sentiment.  Printed those out and glue inside.  Easy Peasy.  Done!


Here is a copy of the photo card sign the kids are holding.  It has been sized to an 8X10 jpeg for your convenience and is ready to pop into a frame.  If you download, please let me know if you have any issues with getting it from DropBox.  If you use it, please drop me a line and share!  I'd love to see it.

CREDITS: Tiny White Stamped Hearts Digital Paper courtesy of Mel Stampz

Signature

Wednesday, July 3, 2013

Freebie: Chid's Art Poster Print Template

On Monday I reviewed an HP® Officejet 7500A Wide Format e-All-in-One Printer from Staples and in that post I shared a Child's Art Work Poster Print I created using a template I made in Photoshop Elements.  I'd like to share the template with you, click here to download the file at Dropbox.
This is the first time I've tried sharing a PSD file and using Dropbox so let me know if there are any problems or issues and leave your feedback as to whether or not you like this method.  I am currently using the free version but I might upgrade if this freebie is well received and there is an interest in more.
When you open template in Photoshop Elements it should look something like this.  Each photo space has been labeled and is in it's own layer.  The text has been added for placement and you can easily switch it to whatever you'd like.  A font substitution may occur if you do not have Nadine 2 loaded on your computer.  If you'd like the exact same one I used, you can download it for free at the Font Palace.

My template has been sized to fit in a NYTTJA frame from Ikea that are only $3.99, doesn't get much more affordable than that!  Since it's an odd size at 11.75"X15.75" you can resize the template to fit your frame.  To do this, I suggest choosing all of the layers, except for Layer 1.  The simply drag all of them at once onto a new blank file that has been sized for the frame you'd like to use.  While all the layers are still chosen, drag the corner to resize for your new blank file.

If you have not used clipping mask before, here is a tutorial I like, but a quick online search will yield many options for you to check out.  You may be able to use this template with other programs that use layers but I only have experience with Photoshop Elements so I am not sure.  But since the template if free to download, it's worth a try!  If you do try using it on another program please let me know the results.
In no time at all you will have your own version of this cool poster print.  Click image above for a better preview.  I printed my poster print with the HP® Officejet 7500A Wide Format e-All-in-One Printer from Staples I reviewed and onto HP Advanced Photo Paper, 13" x 19", Glossy.

If you do not have a wide format printer, you can have it done commercially, I suggest the Costco Photo Center for well priced enlargements.  The 12"X18" prints are $2.99 at my location, which will fit the template as it's originally sized.
After finishing adding your images to the template, flatten the layers and then drag onto a new blank 12'X18" file, flatten again and save as a JPEG file.  Send off to print.  You will just need to trim it down to fit the frame.  To make it easier, I laid the plastic insert over my print, traced, and cut.

This might all sound confusing but it really is easy with a little practice!  

Signature

Tuesday, January 22, 2013

Project Life December Part 1

Almost done with 2012, I think I'll have the rest ready to share next week.  That will mean I'll have made it through a whole year of Project Life!  That's really an exciting thing for a repeat PL drop out.  But last year it really saved me in terms of memory keeping.  I know only a small fraction of photos would have made it off the hard drive it it wasn't for Project Life.  Can't believe I feel "caught" up with 2012!  I think that's the magic behind PL, for avid scrapbookers we just want an easier way to record our memories and still be able to play with all the "stuff". 
The first week kicked off our holiday season because Brad's brother, his wife, and their baby daughter came out to visit for a long weekend.  It was the first time we've all been together since both of the "babies" ours and theirs were born.  I forgot to see if they minded if I could share photos of their sweetie pie so unfortunately the pictures of our niece have to be blurred.  You will have to take my word that she is just adorable.
I picked up a the Happy Christmas - Digital Cards by Crystal Wilkerson & Kristina Proffitt early on and got a lot of use out of it.  The 4X6 journaling card, Merry & oh so Bright filler card, and green patterned paper below are all from the kit.  You'll see bits and pieces of that kit pop up all month long.

Back to what we were up to...we put up the tree to see how LB would do with it.  I'm happy to report he didn't try climbing it - a real fear of mine!  I love the soft glow of the tree lights with ER.  The second row has pictures of LB and his new obsession, carrying containers all around and doing an endless round of fill up and dump out.  The bottom row has a picture of ER working on her gingerbread town and checking out the new Crayola gifts we got for review.
One of my favorite little bits this week is this itty bitty Studio Calico frame, just so cool!  I picked up a seasonal set and more general purpose set of 12 so expect to see more of them.  I put a picture of Brad and ER working on the houses inside.  The washi tape is K&Co and the puffy stickers are also K&Co but from an older line.
Most of the pictures on the right side of this week's spread have my niece in them so it didn't make much sense to share it with all the blurry parts.  I thought I'd share how I've been using the set of 3X4 Grid Cards I got when I also ordered the Clementine Core Kit.  I wish I'd also gotten the Page Dividers too.

Anyway, the Grid Cards are so versatile I think they should be part of any Project Lifer's Core Kit, whether you purchase an official kit from Becky Higgins or not.  It's very easy to make them match whatever colors or theme you are working with.  The grid also makes it so much easier to keep your handwriting straight.  For this tag I just trimmed a tag, stuck on some washi tape & a old Making Memories sticker, and popped it onto a Grid Card.
I made an even quicker card by just adding an ornament die cut and some stamped dates.  The ornament and tag are both from the Mod Holiday collection by K&Company.
This spread and the two inserts are all from December 8th when we went to Breakfast with Santa and spent the rest of the day with my husband's family.  I know that's a lot of space dedicated to one day but I know that I might never get around to making a scrapbook page for these pictures and there were just too much to contain in any other way.

I put all the pictures from the breakfast on the first divided protector.  I had so many I wanted to include there wasn't much space to make it look pretty.  Next to it, in the first insert is part of the program.  I always want to include more bits of life for Project Life but always seem to run out of room so it was nice to include it this time.
On the reverse side of the first insert I made a quick little scrapbook page with the family pictures we took after breakfast.  The Ho Ho Ho text card is from the same Happy Christmas kit I mentioned before, the border and Happy Holiday Season are from the same sheet of paper from the Winter Wonderland collection by My Mind's Eye.
Following that insert is another, this one has pictures from our annual trip to see the elaborate holiday decorations at this upscale mall that's by Grandma Norma's house.  ER just loves the Christmas fairies.  I used the Jolly Holiday Recollections paper pad for most of this and the right side of the spread, shown below.
Normally I would probably skip showing you this just because I blurred so much of it.  But I decided to share it anyway because I wanted to show where I used the I Believe in Santa freebie filler card, shared over the weekend. 
I needed something bright to match the other papers I used and kept it on the plain side so it wouldn't clash with the paper used right above it.  The Santa journaling spot was cut right out of the Holly Jolly Recollections paper pad (Recollections is the Micheal's store brand).
There are two versions of the freebie, the Red version I used and this one, which I actually prefer, with a beautiful patterned background.  Both are available for free, in this post.  If you need a filler card for Martin Luther King Jr. day I have two quote filler cards that I just shared yesterday, you might like to check out.
Turning the page will bring you to the week of December 9-15.  It began with a ladies day out to a Sugar Plum Tea Party and seeing the Nutcracker performed by a local Youth Ballet.  If you're keeping up that means from last Wednesday through Sunday we were running and busy with family.  It was one whirlwind of a kick off to December.

At the tea party the ballet dancers came out and mingled with the guests. I was really nicely done and ER just loved seeing the beautiful costumes up close.  It was also special because both Grandmas were with us, plus we had front row tickets.  ER said it was her favorite holiday activity.  I'm so glad we went!
The first insert is Design G, with pictures from our family celebration for my brother's birthday.  It was the same day of the Nutcracker.  My Dad, brother, and Grandma Norma's boyfriend Ray came out with each Grandma and they hung out at home with LB having a Men's Day while we were at the show.  Our time was more fun. Dad and Ray got put to work moving dry wall down to our basement.   They're good sports. 

When the ladies got back from the ballet we went to dinner, which was very crowded and a long wait because the restaurant was booked for the Nutcracker cast.  They were having their closing night celebration so we got to see them again!

The ornament filler and journaling card plus the snowflake circle are from...you got it the same Happy Christmas kit.  See, I told you that would be popping up a lot!  Just really loved it.  The birthday paper and elements are all from an older DCWV.
I used both the horizontal and vertical 5X7 page protectors to add two of our Christmas card designs.  We ended up with four different versions because of all the various deals and coupons I used.  These are from Ink Garden (front) and Shutterfly (back).  We also got square cards from Tiny Prints, which were also printed on the pearl white shimmer paper.  That was just beautiful, I got a lot of feedback on those.  The recipients just loved them.
The second half of the week has one of the most exciting things to happen to me lately, even though it's just tucked in there.  Can you guess, yep it's getting an iPhone5!  I have wanted one for a long, long, long time and love, love, love it!  It is so unnecessary and such a luxury so I feel so lucky to have one.  My husband is such a nice guy, that when it came he let me have it right away.  We were already paying for the new contract so it didn't make sense to wait, he told me.

A good deal of the page is about the Daisy Holiday and Service Project, the girls made tray favors for our local Meals on Wheels to deliver with meals.  We also made reindeer snacks; it was a busy meeting but a lot of fun.

At the top right is a cool picture with some accidental bokeh that I captured with a stack of our finished cards ready to send out.  I used extra Vistaprint return address labels that I got for free during a holiday promotion on a Grid Card for filler.

The bottom card has my first iPhone pictures and are of my husband at the movie theater and brother Dave at the restaurant when we took him out for his birthday and to see The Hobbit opening weekend.  I'm really happy with how everything turned out, but I may switch the coffee talk card at the far right.  That's the same day at the tragedies in Connecticut.  I had my neighbors over to chat and since none of us were on our devices we had no idea what had happened.  It was like a few last hours before the calm.   I think the stickers I used are a bit too cheerful. 

Sharing at Jessica's The Mom Creative.

Signature

Monday, January 21, 2013

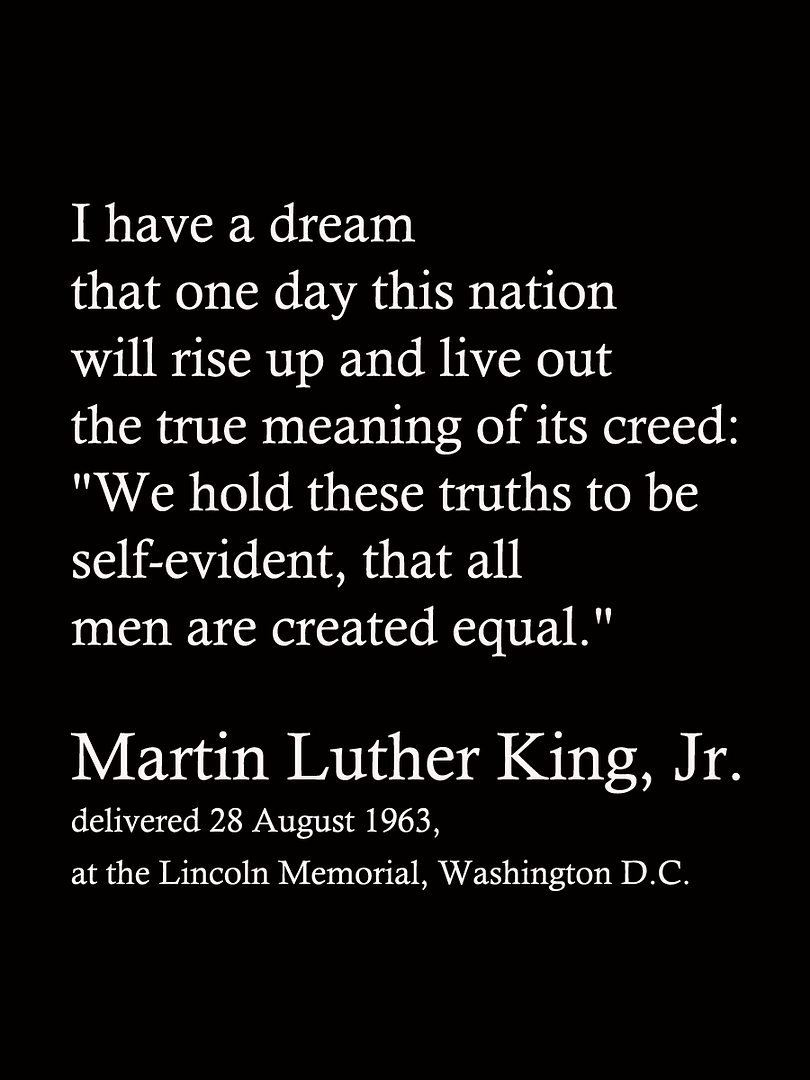
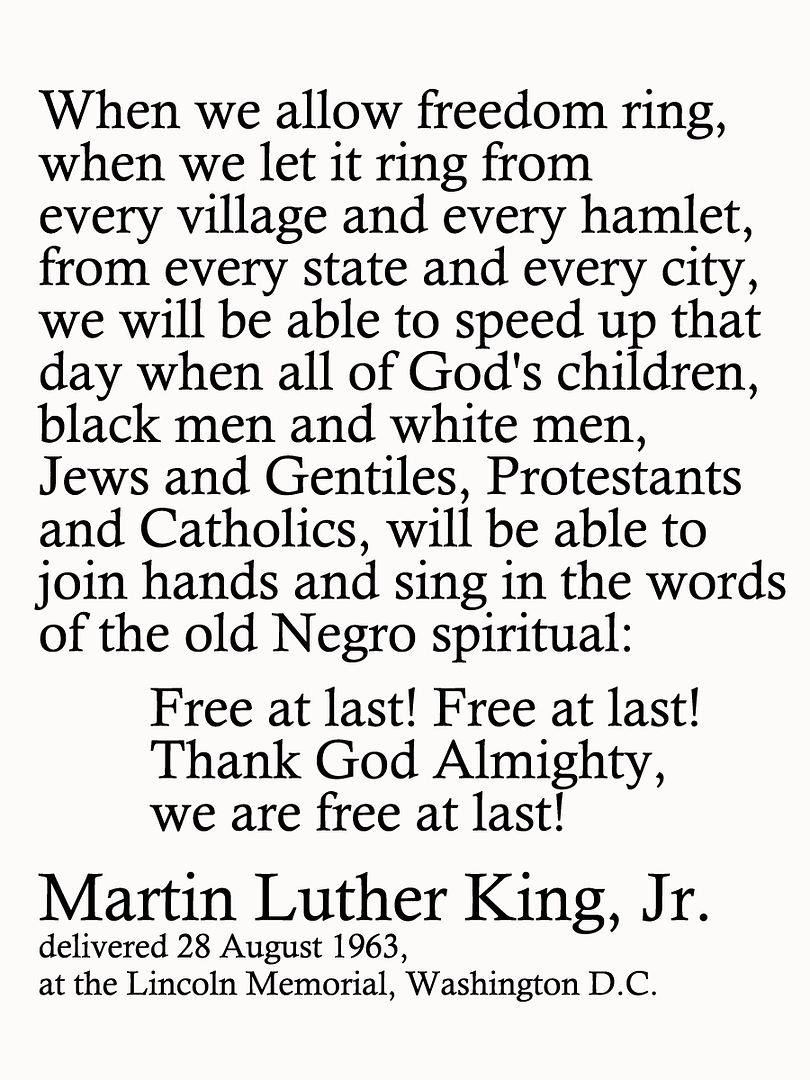
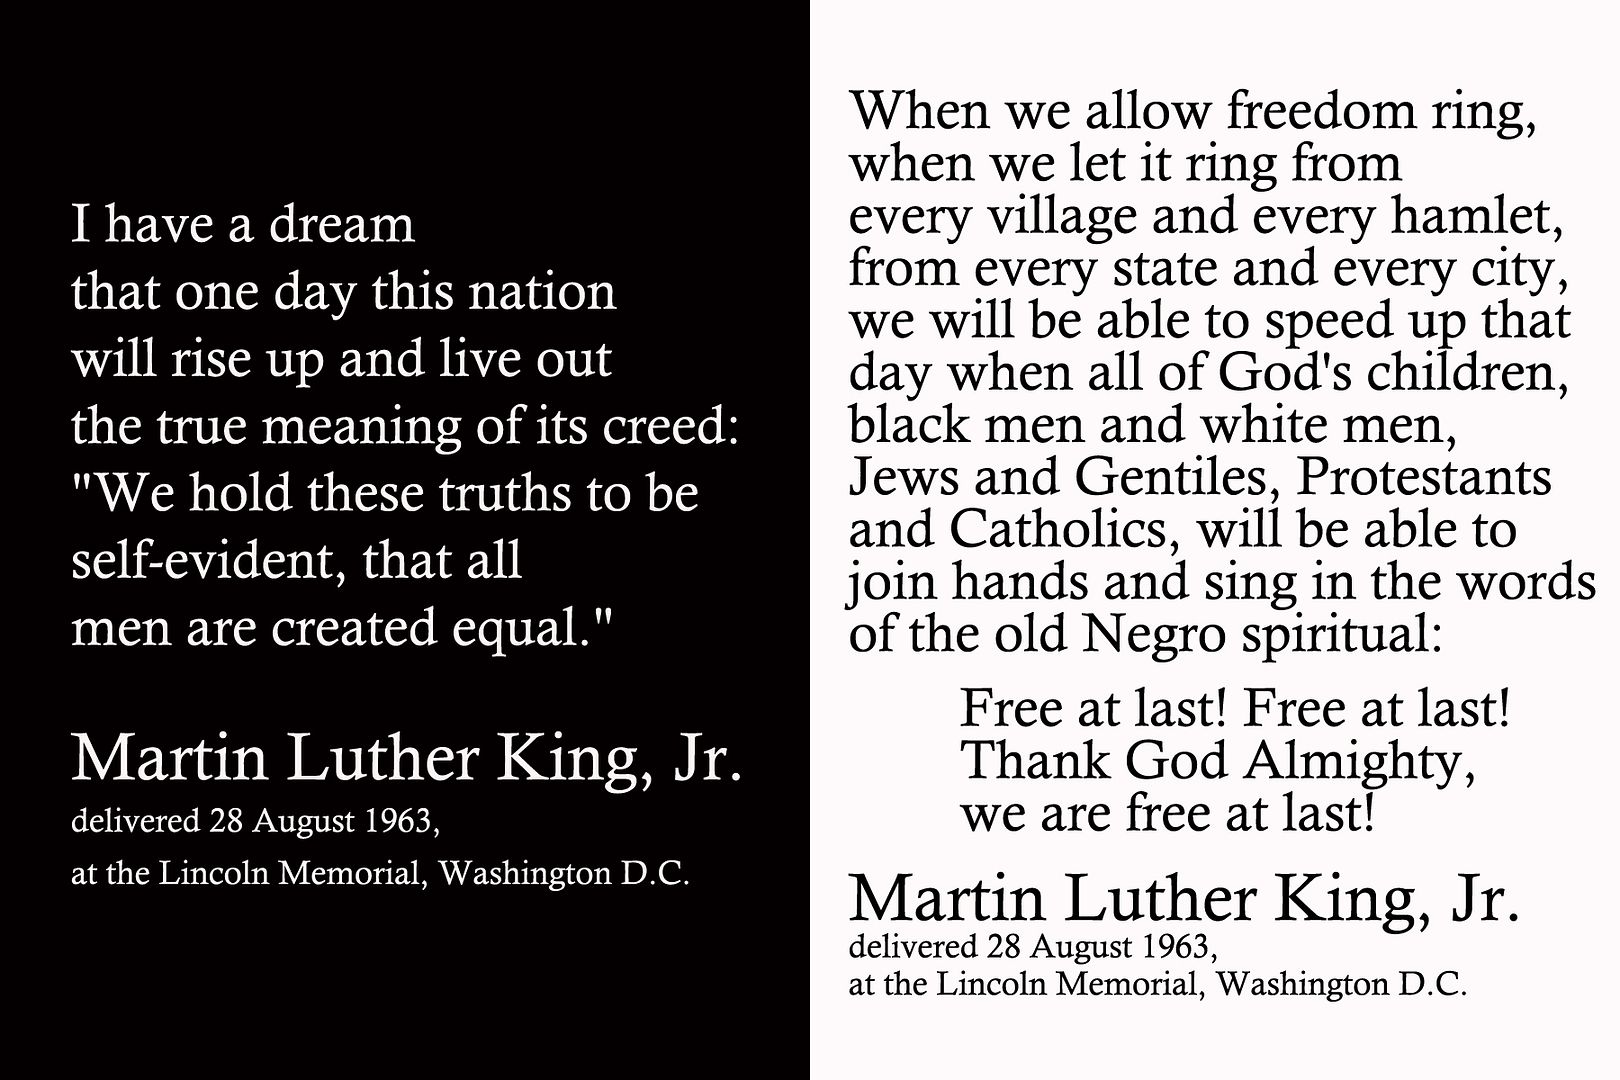
Martin Luther King Jr. Filler Card Quote Freebies

My kiddo is home from first grade today, we watched President Obama taking the oath of office for the second time and talked at length about Martin Luther King Jr. and the Civil Rights movement.  Serious topics for a six year old but one she was very interested in.  Sometimes it is hard for her to understand that as a child of mixed heritage at one point in our country's history she would have been discriminated against and that the marriage between Brad and I would have been against the law.

To mark this day in my Project Life album I decided to create a quote filler card and share them with anyone else who might like to use them.  Both quotes are taken directly from his historic "I Have a Dream" speech.

The top two are 3X4 png files and at the bottom I've put both onto a 4X6 jpeg canvas so anyone who doesn't know how to work with png files can send the image directly to wherever they get their photos printed.  Click on the link below each image and then right click to save to your computer.    

These are for personal use only.

 photo IHaveaDream_zpsb496ab8c.png
 photo LetFreedomRing_zps69ed28dd.png

 photo MartinLutherKingJrQuotes_zps3c9bf4b3.jpg

Signature

Sunday, January 20, 2013

I Believe in Santa - Filler Card Freebie

While working on my December Project Life pages I needed a seasonal horizontal filler card.  When I couldn't find something I liked, I made a quick one in Photoshop and thought that since many Project Lifers are a bit behind, I would share in case someone else was having the same problem.  I'll be sharing my Project Life page using it soon!

Click the link below each image to be taken to the larger PNG file version, then right click to "Save As", and save the image to your computer.  Then print out, round corners, and slip into your album. 

Please note these are for personal use only.

 photo IBelieveinSantaRoundBlog_zps5eb3afbf.png

I needed a plainer filler card because the space above it in my album was busy with patterned paper and Santa image.  This is the one I used.  But I thought a little bit a pattern would be much prettier.  Thank you to Mel Stampz for providing the digital paper freebie used to make the second filler card, shown and linked below.  If you use either I'd love to see it, link me up!


Signature

Monday, August 22, 2011

Every Man Kit Release with Quick Page Freebie

Photobucket
Earlier this month Louise at Adorible Digital Designs came out with a fabulous new kit, that's a very timely release for me.  Every Man is perfect for celebrating all the important guys in your life, and as you all know, we just happen to have a new little guy to love in addition to the Daddy we already do!  I used it to showcase a really special photograph, the first one of Brad with both his babies, LB was just two days old.
I have to admit, my collection of digital kits suitable for masculine pages is almost nonexistent.  While it's been possible to eek out a few pages by pulling elements from various kits it's so much nicer and easier to scrap with a kit that coordinates so well.  There are plenty of elements to choose from, my favorites are the denim embellishments and the stitched stars.  I think my husband will really appreciate the pages I make that feature him...and no pink!
I love the blues and greens as well as all the word art, that along with the coordinating alphabet have a real varsity type feel to me, lovin' that!  Louise has put together a great kit, there are stars, flowers, stitching, journaling tags, and word art perfect for quick tittles.  I'm so glad she also included words like Uncle, Granddad, and Nephew so that it really is for all the men in your life.
Photobucket
I also made this fun multi-photo page with Every Man to celebrate all the roles Brad has had so far...son, husband, and now Daddy times two.  I've turned it into a FREEBIE QUICK PAGE for all the Adorible Digital Designs fans!  Use the link below to access it; then right click and save to your own computer.  Your version will have four empty photo spots and an empty center journal spot ready for your own special touches.

Click Here to Download

Please remember to respect the designer - for personal use only, and leave us some comment love if you download the Quick Page.  I'd love to know what you think!
 

Before you leave, I also wanted to let you know, these awesome clusters made with Every Man are also available.  They are so cool and I wish I could take credit for one of them, but the Creative Team didn't make them this time.  They would be great to use to whip up a quick mini book. There's also a Blogwear Set you've gotta check out!  I think it would look great for fall.  Every Man is so versatile, I know it'll be one kit you use over and over.

Signature

Disclaimer: I am a member of Adorible Digital Designs' Creative Team and receive access to kit, to create promotional items.

Tuesday, August 2, 2011

Bundle of Joy Boy Freebie: Guest Book

Hello!  We've been home since late morning Sunday and are getting adjusted to having a little newborn in the house again!  I had a C-section last Friday and the surgery went a lot smoother than last time, my nerves didn't get the best of me and I was able to stay alert for the whole procedure.  Recovery at home is moving along and thankfully I have my mom out to help us.  I'll be taking some time off from blogging, although I will pop in and share some pictures of our newest family member by the end of the week.

So many of my readers have been supporting me throughout this whole pregnancy I wanted to think of a way to say thank you.  I made a traditional paper version of this project, that I'll share pictures of soon, and wish I could hand make something for everyone!  Since that just isn't possible, I've created this digi version of my project and to celebrate our new son's birth, Louise the designer at Adorible Digital Designs has agreed let me share a cute guest book I made using  kit Bundle of Joy Boy

The full post and links to the templates are on Louise's site, but here's a sneak peek! It's a set of templates to make a Baby Guest Book!  The idea is to have the filler pages printed out ahead of time, and then as each family member or friend meets the baby for the first time, you have each one fill out a page.  Afterward, you can add a picture of them together over the space provided.


Preview Image: Meeting Cover
It's an easy peasy way to do something special for baby's arrival and create a special keepsake for your little one that incorporates your family's and friend's handwriting as well as thoughts and memories. Above is the title page and below is an introduction page for you to put at the beginning of your book.  Just add your photo and details before printing out. 
Preview Image: Intro Page
This is just a starting point, be sure to pick up Bundle of Joy Boy so you can create more pages to add to your guest book!  Page templates are sized to fit an 8X8 scrapbook, a standard scrapbook size in the US and the reason I love a hybrid version is because you can print out as many as you need and everything will always coordinate.  No worrying about having to scramble and make extra pages and running out of supplies.  For printing tips, see my previous guest post at Adori Graphics.


Preview Filler Pages
Here's a preview of the filler pages for the photo and message.  Each side is a separate file, but I've shown them together so you'll get a better idea of how your book will look when it's open. 

Downloads for Personal Use ONLY, please respect the copyright of Adorible Digital Designs.  Please leave me us a comment if you download, we'd love to hear what you think!  Click on the links below.

If you haven't already, don't forget to check out the Bundle of Joy Mini Book Freebie, I made for the kit release. It's still available for download on my release post and coordinates perfectly with the Baby Guest Book.

Signature

Monday, August 1, 2011

Carefree Summer Kit Release: Freebie & Giveaway

I'm taking a break from blogging to be with our new baby, born last Friday, but wanted to pop in and share the newest kit release from Louise at Adorible Digital Designs.  Things have been a little quiet on the design team front as I was already on maternity leave from my responsibilities for the last kit and am still officially off.  I made this digi layout last month, while still pregnant.  Even though being on the computer too long often made my feet swell and made me a little stiff and sore I just couldn't resist playing around with the newest release, Carefree Summer!

I love that pastel striped paper I used behind my pictures and the flowers.  I think of them as stickers, as the white outline reminds me of the kind I used to collect as a child and that I now use all the time with paper scrapbook pages.  All the fabulous colors used in the kit give me so many options!

Freebie Alert :) 

Here's a link to my digi page as a Quick Page, free for you!  It's got two photo spots and lots of room for journaling because the story behind the photos is always one of the most important parts of a page for me.  I want to remember the story of that day and moment; it's my main reason for scrapbooking! 
Visit all the Design Team members to collect more goodies!  You should have come from Louise and the next stop is Tiffany on the Blog Train.  But first here's a little bit more about the kit Carefree Summer, we all used.  As you can see from the element preview above, it's perfect for this time of year!  The soft colors are really soothing and it's perfect for all the water fun, days at the beach, and sweet treats I hope your days are filled with.
Here's the Word Art Strips I used in my title, there's a great variety covering all sorts of things like trips to the shore, carnivals, times spent with family, and all those lazy summer days.  It's great how Louise thought of so many different summery phrases to include, I know I'm going to be turning to these over and over!
There's even more Word Art in this kit, and these make creating pages even more of a snap because each one could be used as a premade title.  I combined two of the words along with the Word Art Strips to make my title extra fun, but I promise you it was so easy and took no time at all to combine the elements for the cool eclectic look.

Win It!

Hurry over to Adorible Digital Designs for a chance to win a copy of the kit, Carefree Summer!  It's the perfect addition to your digi collection, perfect for the season and to get you scrappin' those warm weather pictures right now!  Please note only comments left on Louise's post will count as entries to win the kit!

More Fun!

C'mon back tomorrow, as I'll be sharing another freebie on my blog tomorrow, this time a baby themed one with Bundle of Joy, Boy. But if just can't wait...it's already up on Adorible Digital Designs.

Signature

Disclosure: As a member of Adorible Digital Design's Design Team, I receive access to kits to create promotional items.

Monday, May 23, 2011

Be Inspired Kit Release: Limited Time Cluster Freebie

The day before, on May 7th, we went to a Mother's Day Tea with my Godmother and both of ER's Grandmothers.  We shared a table with my good friend Margaret, her two daughters, and both of their Godmother's.  It was such a lovely event!  The pictures were perfect for the brand new kit from Adorible Digital Design, Be Inspired.  I used the kit to create an accordion fold out book.  Before I show you some pictures of the inside, let's take a look at Be Inspired.
The designer Louise created the Be Inspired for times when bad things happen, but life goes on.  This is mainly reflected through soothing color palatte and the premade word art options with encouraging phrases. I really like the different styled fonts used for those.  It's also a great multi use kit.    A blue polka dot alphabet coordinates and helps you personalize any words or titles you'd like to add.  There are lots of pretty flowers, buttons, leafs, hearts, and tags you can use for journaling.  A banner, colored string & stitching, and frames help make creating your projects a snap.  The designed papers are bold and graphic and come with coordinating solids, not shown above.  Please note the ornate frame used on the front of my design team project IS NOT included, that's been recolored from the Colours of Spring kit.
Here is how the mini book I made with Be Inspired unfolds.  The Mother's Day Tea was a fun excuse to get dressed up and for each girl to bring a special doll, some even came dressed like them.  Little finger foods were served and there was entertainment in the form of a ballet show, storyteller, and some dancing finished up the afternoon.  ER was absolutely mesmerized by the dancers and their beautiful costumes.
The colors of Be Inspired provided a great backdrop for my pictures, which had a lot of busy colors in them.  They really pulled everything together and provided a lovely way to showcase my favorite photos from the day.  It was easy to decorate each mini canvas with few elements, that adds a special touch without overwhelming things and really let all the designs of the patterned paper shine. 

Freebie Alert: Blog Train Featuring Be Inspired Clusters: Available ONE Week Only!

I turned two of the clusters I used in my fold out accordion fold book to create cluster freebies for you!  You can snag them for just one week, along with the clusters the other design team members have made.  Download the cluster above, here. and the cluster below, hereSorry, links expired!  The clusters are now availbe for purchase, click here to see more.  Please remember these are for personal use only.
Continue along the Blog Train to collect the rest.  You should've come from Amanda, the next stop is at Larissa's.  Have fun seeing all the page layout examples at each stop.  For a full listing head back to Adorible Digital Designs, where you can also find purchasing information for Be Inspired and find out how to win it!!!  Here's a preview of all of the gorgeous clusters, available for free this week (links expired) and for purchase afterward:
If you download my freebies, please leave me some comment love and let me know what kind of hybrid projects you'd like to see!

Shared on: Scrappy Saturday's at Scrappy Gifts.

Signature

Disclosure: As a member of the Adorible Digital Designs Team, I receive access to kits to create promotional items.
Blog Widget by LinkWithin

  © Blog Design by Simply Fabulous Blogger Templates

Back to TOP